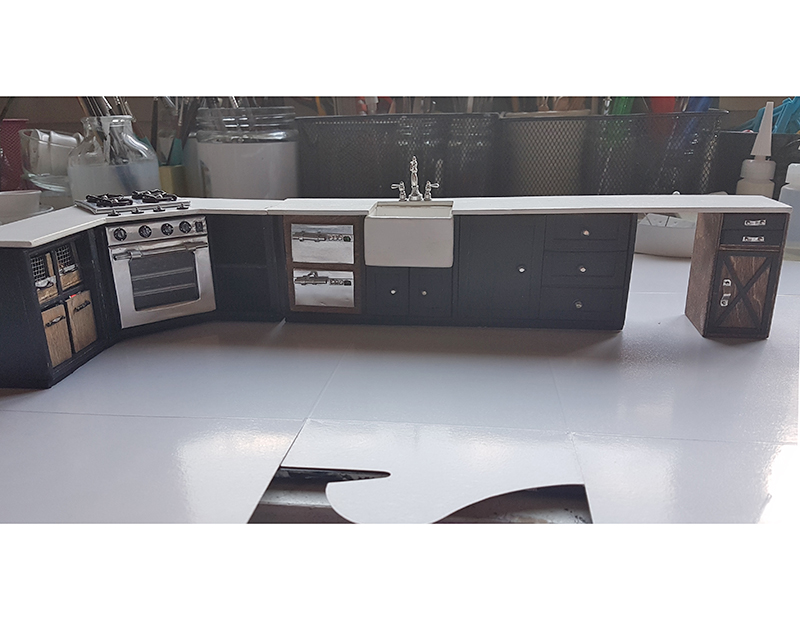
The first part I decided on
One thing I have never had in a kitchen is somewhere for the annoying garbage can to hide and I still don’t! I do have hidden recycle and organic matter bins but still have to have a bin for things like soft plastic and general rubbish. I also like the idea of potato and onion bins – so I made a combined unit as the first counter in my kitchen
.

I made the counter from basswood and had it divided in four parts. I made the veggie bins from basswood, plastic fly netting, some roasting pan metal and wire. The lower pull out bins are made from basswood with some bit of old jewellery for handles. The sliding lids are bits of corrugated cardboard. Unlike the fridge – these things slide in and out and open and closed =)
Try and make things as complicated as you can!
And so I did…by deciding on a corner oven with separate cook top and a around air vent with built in shelving – right! I built the cabinetry first (I had a pic of the process but do you THINK I can find it even though I saw it this morning?) and included a shelf style counter on the right for pots and pans. I seriously make this stuff up as I go along when I can’t find a tutorial – or I will watch a tute for a similar object and THEN make it all up. I made the oven parts following the same kinda strategy as the stainless steel fridge. It even doesn’t open like the fridge hah! I love how the window turned out – the knobs are cardstock.
Imagine my surprise when the fridge, bin counter and corner stove cabinetry fitted woo! I will make the stove top once I have finished the countertop.

Moving on to the kitchen sink
Of course its a farmhouse sink! Another thing I have never had in real life…damn you reeeeaaalll liffffee! This next unit has to house the dishwasher drawers (fancy schmancy) the sink, cupboard and a set of drawers. Once again I built the cabinetry first, leaving my space for the sink unit. The dishwasher drawers do not open but they turned out hell cute and match the fridge and stove in style. And it’s all fitting in so far!


The actual sink is made from balsa which I then sprayed with white acrylic and added 2 coats of Triple Thick to make it really shiny…mmmm shiny… The plughole is a press stud pushed into a hole in the bottom of the sink. It left some little dirty marks and I let them stay. Sinks stay clean for about 2 mins in the real world so I couldn’t have it pristine. I made the sink fittings out of various and sundry silver beads and teeny things and some thick foil .. and don’t forget the two little dabs of acrylic for hot and cold. I had to make the fittings to a specific height etc to fit in front of the kitchen window and take into account the countertop.

The Stove Top
Getting close now. Once I made the countertop (2 separate pieces in case I had to make “adjustments”) it was time to finish my cookin’ bit. I covered a rectangle of wood with more pretty, shiny metal. Used some metal rings, bits of wire and jewellery findings painted in black enamel for the gas hobs. The knobs are cardstock.

The final push!
I had long ago decided to have a small desk area at the end of the counters on the far right side, a place to do house accounts and general busybody stuff and to rest the very right end of the countertop on – I built a leetle cupboard – the drawers work!

And finally the countertop is made from wood and spray painted white. I wanted to keep it simple because I am planning on a busy backsplash.
In place

The Backsplash
I tried sooo many patterns before I finally decided on one. I printed it out on cardstock and scored tile lines with a ball tool and then gave it a couple of coats of matt modge podge because I wanted not so shiny. For definition I added a wooden border in black. The backsplash makes all the difference and gives me the homey feels I like =)


I LOVE the look of your urban country styled kitchen ! I find your wire vegetable bins a wonderful addition and break up the solid front surfaces of the lower cabinets. I love the stove, Especially your professional looking stove top. You farmhouse sink and hardware are Perfect and your choice of custom tiles is Spot On! a TEN out of Ten! 😀
Wow thanks so much! It all kind of grew organically. I had a floor plan but never thought much ahead of the next bit. Now I wonder how other people do it – do they plan the whole thing first? I might try it one room!